I'm sorry I changed my schedule in a hurry last week. This time, I will explain how to use VPN on Android as planned. As explained in the previous article, it is assumed that the VPN server is already running at home. This VPN server does not necessarily have to be the Softether VPN server explained last time, as long as the following conditions are met.
This time, I will explain the setting method on the Android side assuming that the Softether VPN server explained last time is operating.
VPN settings
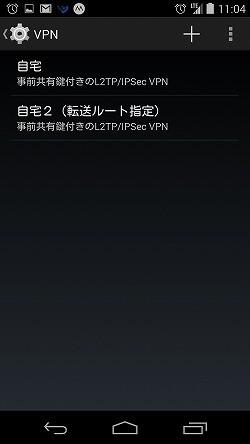
Settings are made in "Wireless & networks" ⇒ "Others ..." ⇒ "VPN" (Photo 01). If nothing is set, the VPN profile should not have been created, so use the "+" button at the top right of the screen to create a profile.
Photo 01: "Settings" ⇒ "Wireless & networks" ⇒ "Others ..." ⇒ "VPN" and use "+" at the top right of the screen to register the VPN settings (profile) |
The following four setting items (Photo 02).
| name | The name of your profile. Attach something that is easy to distinguish.It has nothing to do with the operation |
|---|---|
| type | Select "L2TP / IPsec PSK" |
| Server address | For Softether VPN, specify the domain name "~ .softether.net" registered by Dynamic DNS. |
| IPsec pre-shared key | Specify the same "IPsec pre-shared key" set in "IPsec / L2TP / EtherIP / L2TPv3 settings" of Softether VPN. |
Photo 02: There are four basic setting items. Name (anything is fine), VPN type (L2TP / IPsecPSK), server address, pre-shared key (PSK) |
Basically, this should be OK. If you set only these 4 items, all Internet access will go through the VPN server while you are using the VPN. For example, when you browse a web page with a chrome browser, from the web server side, it looks like the access is being made from the machine running the VPN server. Generally, this is not a problem, but due to the large number of routers that go through, web page display and services may time out depending on the environment.
On the contrary, even for sites that deny access from overseas, if you use this setting, even access from Android overseas will be recognized as access from Japan because it will be via the VPN server at home (in Japan). It will be so.
If there is a problem, set it so that packets are not forwarded to the VPN side only for the home network, via VPN, and for other sites. For this setting, select the "Show advanced options" checkbox in your profile and set the "Transfer route" (Photo 03).
Photo 03: If you want to limit the VPN connection to the LAN, use the "advanced options" to set the "forwarding route". |
"Forward route" is generally "route setting" in TCP / IP. Assign a specific network address to a VPN connection so that only packets destined for hosts in that network are forwarded by the VPN. Packets destined for other addresses will be processed normally by Android (same as when there is no VPN).

This "forwarding route" is specified in the following format.
ネットワークアドレス "/" ネットマスクビット数If you are familiar with networks, you can understand what to set just by saying "home network address", so from here, it is an explanation for those who do not know. The "forwarding route" specifies your home network. In a normal ISP usage contract, a temporary global IP address is assigned, so Internet access is performed using a mechanism called NAT. At this time, a special IP address called "private address" is used for the home network. This often uses an IP address that starts with "192.168. ~", and to find out, check the settings of your home router. The number of netmask bits is a number that indicates the size of your home network, and "24" is used for networks that start with "192.168". By making this setting, you will only be able to access the host in your home via VPN, and other Internet access will not be via VPN.
Since you can register multiple profiles, it may be good to register two profiles, one that specifies the transfer route and the other that does not.
Test the connection
Now let's test if a VPN is actually available. To test, you need a server or client that can communicate with the android side and the home network side. It is possible to check the connection status on the VPN server side, but it is not possible to reliably test whether access is actually possible without using, for example, FTP or the file sharing function of Windows. Also, one of the purposes of connecting a VPN is to access your home network from outside, so you should have some kind of client in it. For example, for Windows file sharing, you can use "Network Browser" (Photo 04).
Photo 04: The test requires an application that communicates with the host in the connected LAN. If you want to try the file sharing function of Windows, prepare an application like Network Browser in advance. |
Some network commands (such as netstat) can be used using the android shell, but there are no commands such as traceroute. It seems that there is something that can be executed from the GUI (for example, IP Tools) in the Play store, so it would be convenient to include it (Photo 05).
Photo 05: Tools such as ping and traceroute can be used by using "IP Tools" which has a network test function. |
Also, since the test needs to be done from the Internet side, connect to the Internet by a method other than your home network, such as a mobile network. In this state, go to "Settings" ⇒ "Wireless & networks" ⇒ "Others ..." ⇒ "VPN" and tap the registered VPN profile to start the connection. If the VPN server is running, the connection should be complete. You will be asked for a user name and password when connecting, so enter the user name and password registered on the VPN server (Photo 06). At this time, if you select the "Save account information" check box, the dialog box will open from the next time with the user name and password remaining.
Photo 06: Tap the registered VPN profile to start the connection, first set the user name and password registered on the VPN server |
When the connection is complete, "Connected" will be displayed under the profile name (Photo 07), and the notification shade will be notified with a key icon "VPN has been enabled" (Photo 08). ). Tap this notification to disconnect the VPN or check the transfer status.
Photo 07: When the connection is complete, the message below your profile changes to "Connected" | Photo 08: In addition, a notification corresponding to the VPN connection is displayed in the notification shade.A dialog such as connection off appears by tapping |
After the connection is completed, check the communication session etc. on the VPN server side. For Softether VPN, open the localhost management page (Photo 09) in Server Management Manager, double-click the virtual hub registered in the above list, and click "Session" on the "VPN Management" screen (Photo 10). Press the "Manage" button. It is OK if there are two items in the displayed window (Photo 11) and one is the IP address of the android machine. However, note that the item "~ LOCLA BRIDGE ~" in this list is a connection between the VPN server and your home network, so it is not a VPN session.
Photo 09: To check the connection on the VPN server side, open the page of the relevant server from Server Manager and double-click the item in the list (VPN virtual hub). |
Photo 10: The VPN management window will appear, so press the "Manage Sessions" button below. |
Photo 11: If you see two items, you have a connection. The first item is the bridge that connects the VPN server and the LAN, so it is always displayed even if the VPN is not connected.VPN connection from the internet is the second in the list |
If the session is established, try accessing the host on your home network using the Android app mentioned above. If all goes well, you're done.


