There is almost no difficulty in setting up OSPF if it is only the basic part. Like RIP, it can't be said that there is only one command, but it feels like there is a command to enable OSPF for each interface.
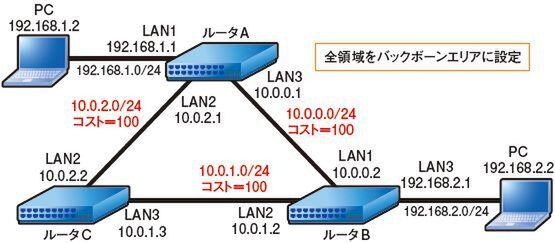
Let's try the OSPF setting method by diverting the configuration used in the RIP setting from the 7th lesson as it is. By deleting and disabling RIP using the "no rip use" command on each router, you can return to the state of simply assigning an IP address to the interface (Fig. 1).
Figure 1 Network configuration for testing OSPF
If you are going to make a new setting, try setting the IP address as shown in List 1 below or Screen 1 of Part 7.
List 1 Setting contents of router A (reference)
To enable OSPF here, first enable it with the "ospf useon" command, which is equivalent to "rip use on". Also, since the entire network is used in the backbone area here, the backbone area is enabled.
# ospf use on
# ospf area backbone
The rest is configuration for each interface. Set which area the interface belongs to and what the cost is. If you omit the cost, the default LAN value of 1 is assigned.
# ip lan1 ospf area backbone cost=100
Apply this to the rest of the interface as well.
# ip lan2 ospf area backbone cost=100
# ip lan3 ospf area backbone cost=100

And to actually activate this setting, chant the following spell. This initializes various OSPF parameters and starts communication with neighboring routers.
# ospf configure refresh
OSPF should start working after this setting is applied to 3 routers (Fig.2).
Figure 2 Normal packet route
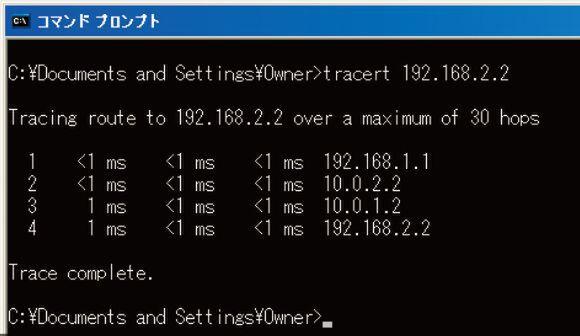
Screen 1 shows tracert from a terminal connected to router A to a terminal connected to router B. Since all link costs are 100, we can see that the A ⇔ B route with the fewest hops is used.
Screen 1 normal tracert (from 192.168.1.2 to 192.168.2.2)
Now, let's disconnect the link between router A⇔B, just like with RIP (Fig. 3). In the case of OSPF, as soon as the link information changes, it is immediately reflected in other routers, so a detour route can be used immediately (Screen 2).
Fig. 3 Route when cutting between A⇔B
Screen 2 tracert when disconnecting between A⇔B
Let's undo the link A ⇔ B and change the cost between A ⇔ B to 500 (Fig. 4). The A ⇔ B route has a cost of 500, and the A ⇔ C ⇔ B route has a cost of 200. In other words, the A ⇔ C ⇔ B route should be more effective. This is now exactly the same as Screen 2.
Fig. 4 Route when the cost between A⇔B is set to 500
Also take a look at the routing table. Screen 3 is what the routing table of router A looks like in Figure 2. Entries with the type "implicit" are added by connecting directly to the router and manually setting the IP address. And what is OSPF is the entry added by OSPF. Focus on destination and cost here. 192.168.2.0/24 connected to the PC has a cost of 200. This is the sum of the cost 100 between A ⇔ B and the cost between B and PC.
Screen 3 Routing table of router A during normal operation
On the other hand, screen 4 shows the routing table when the cost between A ⇔ B is set to 500. The cost of 192.168.2.0/24 has changed to 300. This means that the cost of A ⇔ B and B ⇔ PC is 600, and the sum of the costs of A ⇔ C and C ⇔ B and B ⇔ PC is 300, and the route A ⇔ C ⇔ B was adopted. means.
Screen 4 Router A's routing table when the cost between A ⇔ B is set to 500
This article is a re-edited version of Feature 1 "Try and Understand Routing" in the November 2008 issue of Network Magazine. In principle, the content is as of the time of posting, and may differ from the present. |


